ikea dining chair gilbert

Dining chair underframes & seat shells Dining chairs Dining chairs don’t just have to feel good when you sit on them, they need to look good, too. Ours have the right proportions to be comfortable, even if you like to linger over dessert. They come in different styles so you can find what best suits you. And we’ve designed them to match our tables if you want to coordinate your dining area. IKEA FAMILY products & offersWho doesn’t want high style paired with budget prices? I shopped for a dining room table and chairs with a client this weekend, and the chairs we chose cost about $3000 for six. They are FABULOUS, of course, but not everyone can afford to spend that much money on dining or kitchen chairs. Which got me thinking about some of my favorite bargain chairs from IKEA. Let’s start with my current favorite – a modern take on the classic black windsor, this stylish dining chair would look great at a rustic farmhouse table or a metal industrial dining table.

IKEA PS 2012 for $89 This is another classic with an x-back that would work in both traditional and contemporary dining rooms – it’s a lot like one I used in a recent dining room design. IKEA Ingolf Dining Chair $59 Your grandmother’s ladderback dining chair now comes in a new finish – weathered gray pine. And it’s a cutie – it reminds me of one of the chairs out of Goldilocks and The Three Bears! IKEA Kaustby dining chair $39 If you prefer something a bit more informal and contemporary, these lovelies might do the trick in your dining room or kitchen. IKEA Preben dining chair $119 Great paired with an informal wood or glass kitchen table, this is simple and perfect in white. IKEA Gilbert dining chair $59 This one’s a bit more playful and would be a fun addition to a sleek, modern kitchen. IKEA Vilmar dining chair $39 Last but not least, this acrylic kitchen chair takes up next to no visual space, making it a no-brainer for a small room.
IKEA Tobias dining chair $79 Which one is your favorite? Have you had a good experience with IKEA dining chairs, or do you have a source for other bargain finds?
wooden rocking chairs utah Gather for the food.
where to buy wheelchairs in orlandoStay for the stories.
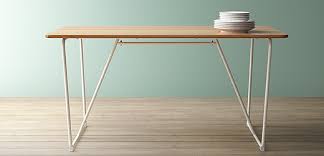
granås table and 4 chairs black glass Getting them to the table is easy. So our dining furniture is designed to help with the hard part – keeping them there. Because when the chairs are comfy and the table is just the right size, everyone will be happy to stay for a while (even if there's no dessert). Up to 4 seats, Up to 6 seats, Up to 10 seats, Dining table tops & underframes Dining chair underframes & seat shells,

Number of Pieces see all Buying format see all Item location see all distance 2 miles 5 miles 10 miles 15 miles 20 miles 50 miles 75 miles 100 miles 150 miles 200 miles 500 miles 750 miles 1000 miles 1500 miles 2000 miles Delivery options see allThe dining room used to be a place just for eating. Nowadays, it's becoming a place for just about everything that happens at home. With plenty of tables, chairs and storage to choose from, our dining room furniture is designed to help you get more out of your space. More laughter, more talking, more playing, more working – more of all the things you enjoy doing while you're there. 1 - 25 of 260 ads for "ikea chairs" within Dining ChairsStart the kitchen planner Find out more about our delivery service make / manufacturer: IKEA model name / number: Gilbert QR Code Link to This Post Set of 6 IKEA "Gilbert" dining chairs. These are white, bent plywood with stainless legs. Very comfortable but lightweight.

It’s amazing what a fresh coat of paint can do! Last month, I gave a few of my dining room chairs a facelift, and I must say, I’m extremely happy with how they turned out! So what spurred on the inspiration for this project? I had 4 IKEA GILBERT chairs that we chose to reuse from our old dining table set. They were finished in a birch veneer that is typical of IKEA furniture, which didn’t quite go with the dark chocolate brown-almost-black finish of our current dining table. We chose to reuse the chairs because they were in perfectly good condition and couldn’t justify spending more money on new chairs. Therefore, my mission was to figure out how to update these guys to make them look like they actually belonged in my dining room. After some thinking and researching on Pinterest, I decided by my best option would be to spray paint the chairs. I found two pretty good blog posts by AllThingsThrifty about the basics of spray painting and painting furniture, which helped me plan out this project.

Here’s a list of supplies that I used: – High Grit Sand Paper – 2 cans KILZ Original Spray Primer – 3 cans of Krylon Spray Paint in White Gloss – 1 can of MinWax Polyacrylic Spray in SemiGloss First things first, I disassembled my chairs because the back, the seat, and the legs are all separate pieces. I did this to (1) minimize the parts of the chair which did not need to be exposed to spray paint (i.e. the legs) and (2) avoid paint pooling in between the crevices where the chair back and seat meet. I also planned to spray paint the bottom of the chair for uniformity. So I took the blue painter’s tape, covered the screw holes as well, and trimmed away the excess for perfect coverage. Next, I set up shop in the garage (LOVE the fact I have this space to do messy projects now!). I made sure to clear the space and cover the floor, and park the car at the other end of the driveway. I also set up small cardboard boxes to use as pedestals to place the chair pieces on for painting/drying.

Saving all those cardboard boxes came in handy! Now it was time to paint. The basic plan was to first prime with the KILZ, then paint with the Krylon white paint, and finally seal with MinWax Polyacrylic spray. I basically followed the application instructions on the spray cans. Surprisingly, it was a pretty straight forward process. I learned a few things about spray painting from this project: 1. Sanding isn’t always necessary before priming. I didn’t sand the surfaces before priming as the chair surfaces were already smooth and sealed. Instead, I just wiped them down with a clean paper towel. The KILZ did a pretty good job of prepping the surfaces for the paint to adhere. 2. Shake the can for the minimum indicated time on the can. It makes a difference! 3. Apply in thin even coats. Use steady, constant sweeping motions. But make sure the coats aren’t too thin (like a dusting) or else I found that the applied coats would dry with a sandpaper finish. This then required more sanding in between coats, and thus, more coats of paint to get a smooth finished coat.

4. Spray paint items in an upright manner. I initially spray painted the first few chair pieces on my makeshift pedestal with them parallel to the floor. I noticed that I wasn’t getting a consistent smooth coating on the pieces. Then, it hit me to stand them upright in a bigger box against the wall. Once I did this, the painting became so much easier as the paint went on in more even, smooth coats, and required less touchups afterwards. 5. Sand and wipe clean in between coats. Sand as needed, but definitely make sure the surface is clean before you apply another coat. 6. Be patient and let it dry! Not only does the paint need time to be dry to the touch, it also needs time to set up. Do not rush this process, although it might be tempting.Here’s how the chairs turned out! According to my husband, they look like store bought chairs. I’ll take that as a compliment because I only spent $40 on supplies for this project minus the cardboard boxes (which were free)!