herman miller chair broke

Send us a message Herman Miller creates inspiring designs to help people do great things at work, for learning, for wellness, at home, wherever people are. Our designs and the designers who work with us solve real problems for people and their organizations. We stand behind the quality of our solutions 100 percent, which ensures that people have the tools they need to do their best. Our warranty covers everything—including electrical components, casters, pneumatic cylinders, tilts, and all moving mechanisms. It recognizes the changing nature of work and the need for products that can stand up to continuous use. And it means that when warranty work is performed in the U.S. and Canada, Herman Miller foots the bill. If you need product service or repair, please contact the Herman Miller dealer, retailer, or our online store where you purchased your product. They will be able to make the final determination whether the issue is specifically covered under the warranty and eligible for replacement or repair.
See our FAQ page for answers on other topics.As most of my readers know, I have a very nice Aeron chair that I got when I was working at home full time. The decision to invest $600 in a single piece of furniture I was going to use day in and day out wasn’t lightly taken, but I needed something comfortable, durable, and designed for my size and weight. An Aeron size C from ebay fit the bill nicely. I’ve had my share of problems with it, including a broken ‘pan’ seat and a damaged lifter.
herman miller aeron office chair usedThe seat was covered under warranty, and I was able to replace it myself, but the lifter needed a trip to a local repair shop.
folding chair rental san jose ca The last couple weeks, the chair has refused to recline.
graco high chair recline
The levers on the left side that allow forward and backward motion were ‘locked’ in position, and I couldn’t undo them. It was making me not want to sit at my desk – and even though I’m not working fulltime at home, I know that if there’s something that makes an experience less than enjoyable, I’ll avoid it. So I was sitting on the couch with my laptop or working downstairs. Last night, I decided to haul out the toolbox and see what could be done… First and foremost, I don’t recommend anyone who isn’t comfortable crawling around on the floor, and possessing a decent set of tools to attempt these sorts of repairs.
beach chair rentals cocoa beach flThe Aeron chair is built with an eye toward long term maintenance and durability.
wooden rocking chair birminghamIt has Real Live Parts in it, so you should use Real Live Tools to work on it.
table & chair rentals detroit lakes mn
Since the problem I was having was with the recline mechanism, I traced the cables from the levers. They disappear into that formless box underneath the seat. After some wriggling around, I decided I needed to remove the seat to get better access to it. Much of the chair is held together with allen-head bolts, so having a good set of standard-sized allen wrenches is required. Remove the two bolts from the sides of the pan, and remove the two bolts at the end of the arms under the mechanism box.
table and chair rentals galveston txThey came out easily for me, but they were obviously snugged in.
chair and table rentals in daytona beach flOnce those bolts are out, pull the seat out and set it aside.
tables and chairs rental in cebu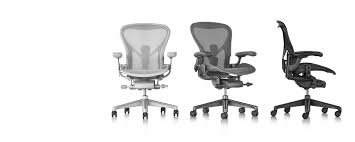
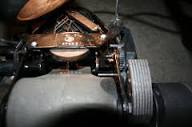
The next step is getting the box open. It’s a plastic housing that has only 2 screws visible on the outside – a set of phillips head screws on the bottom. Don’t undo those yet. The plastic housing is one of those ‘snapped together’ arrangements. I had the benefit of having the housing loose already, so a little prying and wriggling with a large flathead screwdriver, and the whole assembly popped apart. This is fairly rigid plastic, so don’t twist, you could break off the tabs, but gentle pressure around the joining edges will win out, and the top will pop off. Once the top is off, you can see the mechanism inside. For the problem I was working on, I needed to reach the underside, so I undid the two phillips head screws, and pulled the bottom cover off. These screws, by the way, are sheet metal screws, not mechanical screws. They thread into the metal of the chair. The chair mechanism is remarkably simple, and made sense once I looked at it. It was obvious that the two levers control the distance the chair can tilt one way or the other, using a set-bolt on one side, and a rotating cam on the other.

The rotating cam designates how far back the chair will tilt, the bolt sets where the forward tilt stops. While wiggling the cables around, I realized that the tilt mechanism had gotten jammed with the forward tilt saying “FURTHER BACK” and the back tilt saying “FURTHER FORWARD”. The only way to unjam these was to take pressure off one side of the mechanism so they could rotate. But how to do that? The answer came in the set bolt under the forward tilt. There’s a massive assembly there (for a chair) obviously taking all the pressure for the forward tilt. It has a large (allen-headed) set bolt, accessible from the bottom, that can be used to adjust the ‘stop point’. I set my largest wrench into that bolt, and backed off the tension 1, 2, and… Looking to the other side of the tilt mechanism, I had relieved enough tension that the recliner cam had snapped back to where it was supposed to be. Now the levers were operating properly! I could slide the recline lever up and down and see the cam rotate from one side to the other.

After puttering around inside for a little, getting an idea how the tensioner for the recline mechanism works (it’s a lateral screw driving a spring – maybe I’ve worn out my spring, because running the tension from stop to stop via the knob on the side never really did anything), I decided it was time to pack up. Reassembling was relatively easy, except for getting the panel screws back in place. Remember, not mechanical screws, and in an awkward location. The answer came when i figured out you could see through the mechanism to where the screw was attempting to thread into the mount. A bright light down there and I was able to line up the screw properly. Reassembly was easy – two screws to put back on the lower housing – be careful to lay the control cables back into their slots, or else the housing won’t go together correctly. 4 bolts to put the seat pan back in place, and I was done. I am very impressed with the construction of the chair. It has solid, well designed parts all the way through it.